Adding mods to your Arma 3 game server

Rent your own ArmA 3 game server! citadelservers.com
This will be a guide on how to add mods to your ArmA 3 server.
Method 1 - Workshop Downloader
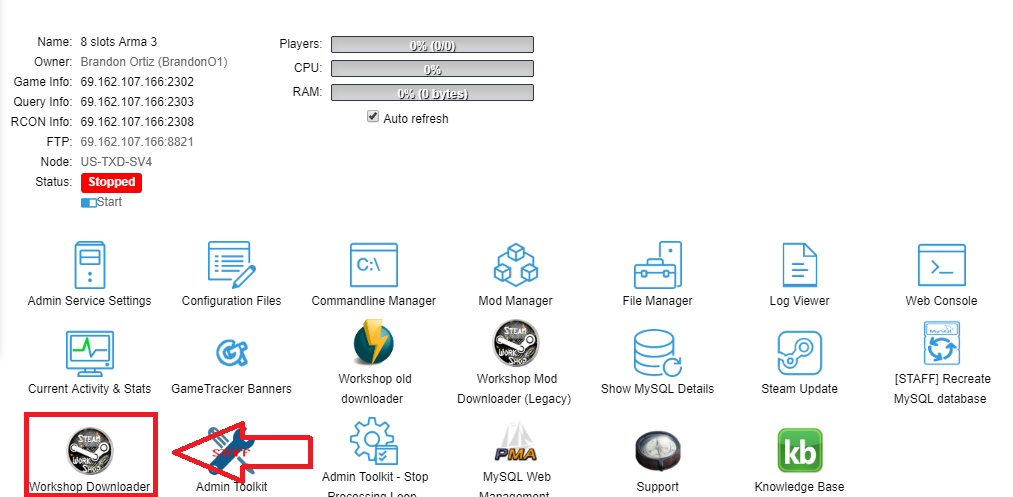
In your game control panel you will want to click on the button labeled "Workshop Downloader" (Example image below)
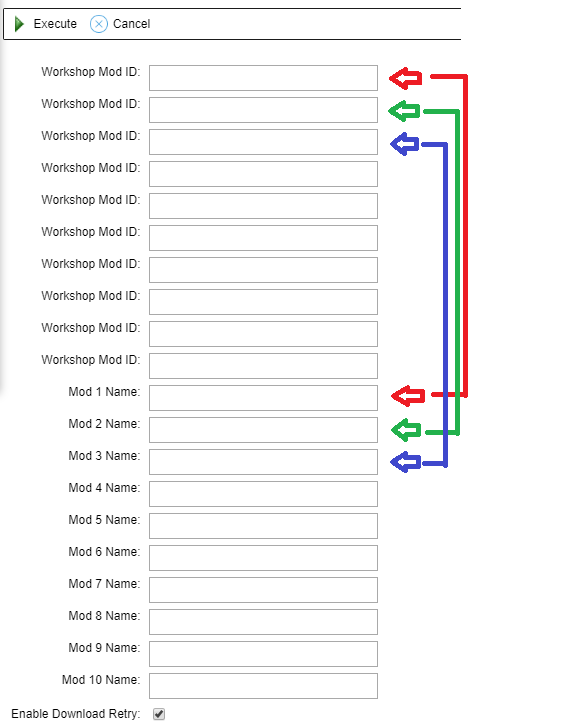
Once here you will want to fill in the text fields with the required information
The upper-most Workshop ID will create a folder to be used by the text field "Mod 1 Name" (Example below)
To obtain a workshop ID you need to go navigate to steam workshop in Steam and open up the workshop and find the mod you wish. Each mod will have a link such as this - https://steamcommunity.com/workshop/filedetails/?id=450814997
At the end of this link you will see the ID number listed as so - id=450814997
Copy the "450814997" in this case and put that in the workshop ID text field
As this is the mod ID for CBA_A3 you will want to name the folder something to help you identify it such as this for the mod 1 name - @CBA_A3
A mod folder name can not accept spaces as they will not be registed and will cause ArmA 3 to not read the whole folder name, if you want to use spacing you will want use a character such as this _ (EG: @CBA A3 will cause the server to just read @CBA, but as @CBA_A3 it can read the whole folder name)
Each step down works the same with the next ID using Mod 2, then the next using Mod 3 and so forth. (Example image below)
The Workshop Download tool will migrate the Keys/Addons folders from the mods automatically as long as the mod has the folder names with these files for the mod set as "Keys" for the keys and "Addons" for the addons.
If they are not set to these names then they will need to manually migrated to the Keys and Addons folders
To do this you will want to use an FTP client such as Filezilla or create a folder called Keys and zip it, then upload the zip to the root directory of the server using the file manager and unzip the folder. Do the same for the addons folder
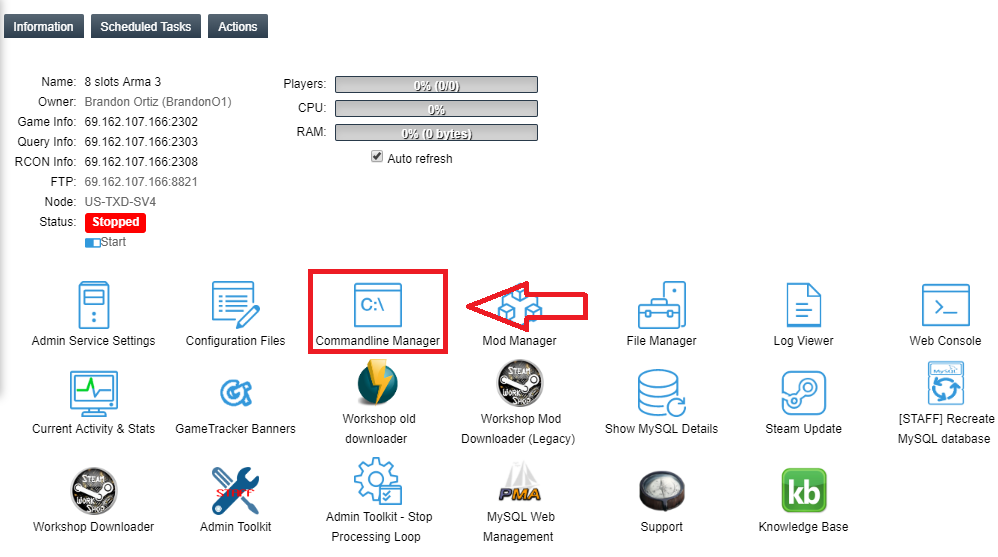
Once this is all complete you will want to navigate to your command line manager from the game control panel
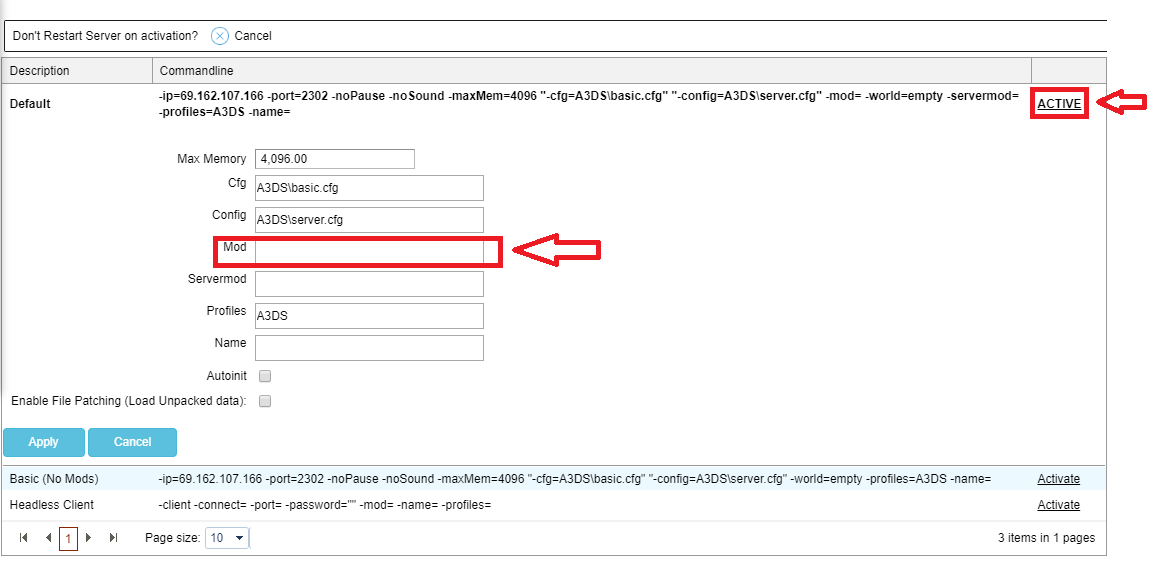
Here you will want to add your mod names to the Mod text field (Ignore the servermod text field)
Mods should be added like so
@Mod1;@mod2;@mod3
Mods are seperated by the ; and load order is very important for ArmA 3. If a mod is dependent on say CBA_A3 then CBA_A3 must load before the mod that requires it like so
@CBA_A3;@Mod_requiring_CBA_A3
If it setup as so
@Mod_requiring_CBA_A3;@CBA_A3
This will not work as the first mod will not be able to load as CBA has not been loaded yet
Method 2 - Manual Installation
This works much the same as the first method but without the workshop downloading tool
First you will want to download your respective mod and locate it from wherever you had it download to.(Workshop file download location is this - \Steam\steamapps\workshop\content\)
Once you have your mod you will want to rename the folder to what you wish for it to be called such as @CBA_A3 if you were to download CBA
After this you will want to upload your file to the server to the root directory, either through the file manager or a third party FTP client such as Filezilla
NOTE: A folder being uploaded through the file manager will require you zip it before being able to upload
Once uploaded you will need to migrate the Keys/Addons folder from the mod to their respective folders within the server, inside these folders you will find .pbo's and .bikeys that need to be moved to the root directory keys folder and addons folder respectively
After this is done you will want to go to your command line manager and click activate on the first command line listed and begin adding your mods to the command line (Image below)
Here you will want to add your mod names to the Mod text field (Ignore the servermod text field)
Mods should be added like so
@Mod1;@mod2;@mod3
Mods are seperated by the ; and load order is very important for ArmA 3. If a mod is dependent on say CBA_A3 then CBA_A3 must load before the mod that requires it like so
@CBA_A3;@Mod_requiring_CBA_A3
If it setup as so
@Mod_requiring_CBA_A3;@CBA_A3
This will not work as the first mod will not be able to load as CBA has not been loaded yet
