Difference between revisions of "Arma 3 Rcon Tools"
| Line 1: | Line 1: | ||
| − | <div style="text-align: center;"> | + | <div style="text-align: center;"> |
| − | + | ||
| − | + | == '''ArmA 3 Rcon Guide''' == | |
| − | + | ||
| − | + | <div style="text-align: left;">== '''RCON Clients''' == | |
| − | + | ||
| − | + | [https://www.battleye.com/downloads/ Battleye RCON] | |
| − | + | ||
| − | + | [https://battlewarden.net/ BattleWarden] (Free to use client) | |
| − | + | ||
| − | + | [http://www.armaholic.com/page.php?id=19502 EPM RCON] | |
| − | + | ||
| − | + | [https://infistar.de/eng/product/infistar-brc Infistar] (Note this is a paid client, you can not use this for free) | |
| − | + | ||
| − | + | These are the current best known Rcon tools for ArmA 3, Infistar requires you to buy their product but is a great tool. | |
| − | + | ||
| − | + | For this guide we will be using EPM Rcon | |
| − | + | ||
| − | + | == Connecting with your Rcon Client == | |
| − | + | ||
| − | + | All clients will use the same connection information, this section will go over how to get your Rcon connection information and where to put it in relation to EPM | |
| − | + | ||
| − | + | [[File:arma_rcon_1.png]] | |
| − | + | ||
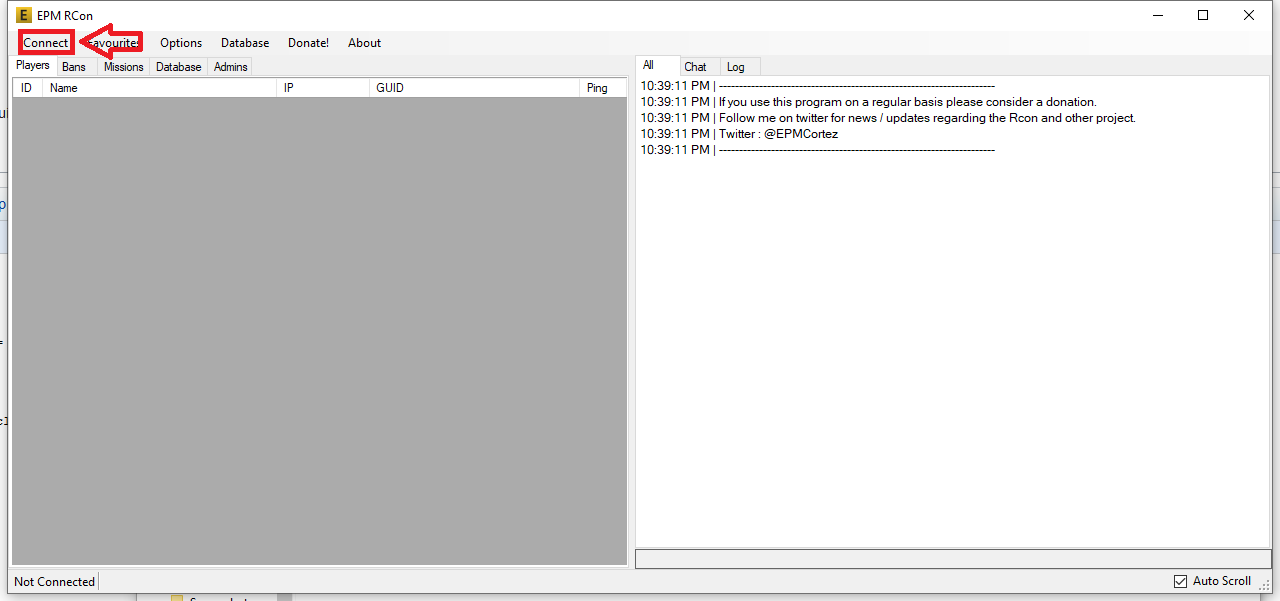
| − | + | In this image you can see the default GUI for the client, in the image above you will see where to go to reach the fields for inputting your connection information. | |
| − | + | ||
| − | + | You will want to click on connect in the top left and then "connect to" | |
| − | + | ||
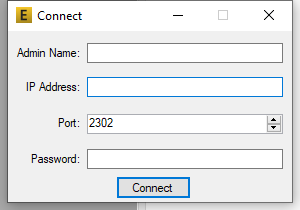
| − | + | This will bring up a box to fill in the respective connection information | |
| + | |||
| + | [[File:arma_rcon_2.png]] | ||
| + | |||
| + | There are four fields to fill in within this new box, below I will go over what each entry is for | ||
| + | |||
| + | Admin Name - This is what your name will be displayed as in-game when issuing any commands that are shown to other players. For instance if you speak to the server it will display it under the name you have set in this field. | ||
| + | |||
| + | IP Address - This must be IP address of your server (See below images for how to locate your IP) | ||
| + | |||
| + | Port - This is the RCON port ( Located in your battleye\BEServer.cfg under configuration files. See image below ) | ||
| + | |||
| + | Password - This is the password for your RCON Client ( Located in your battleye\BEServer.cfg under configuration files. See image below ) | ||
| + | |||
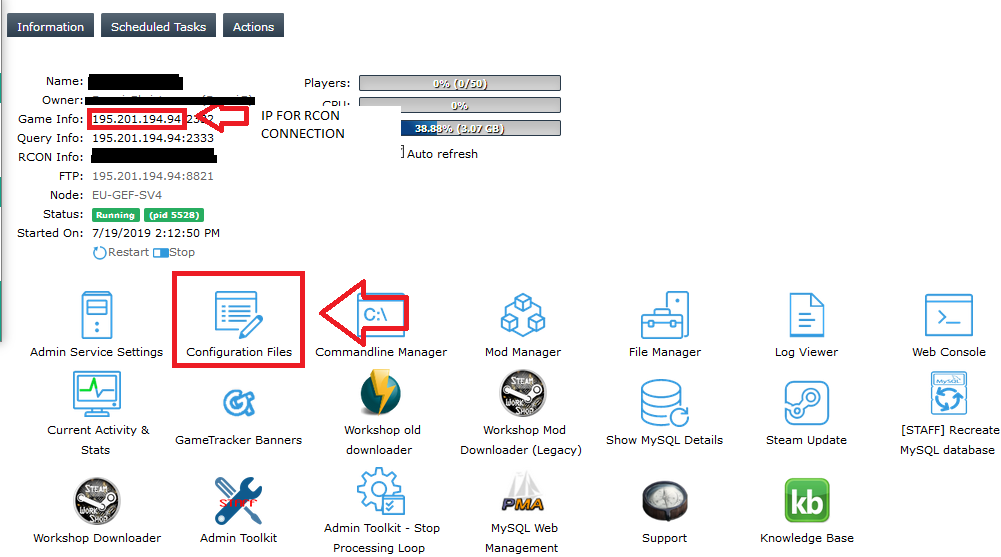
| + | Example of where to location BEserver.cfg and IP for connection | ||
| + | |||
| + | [[File:arma_rcon_3.png]] | ||
| + | |||
| + | Once in the configuration files you will see this | ||
| + | |||
| + | [[File:arma_rcon_4.png]] | ||
| + | |||
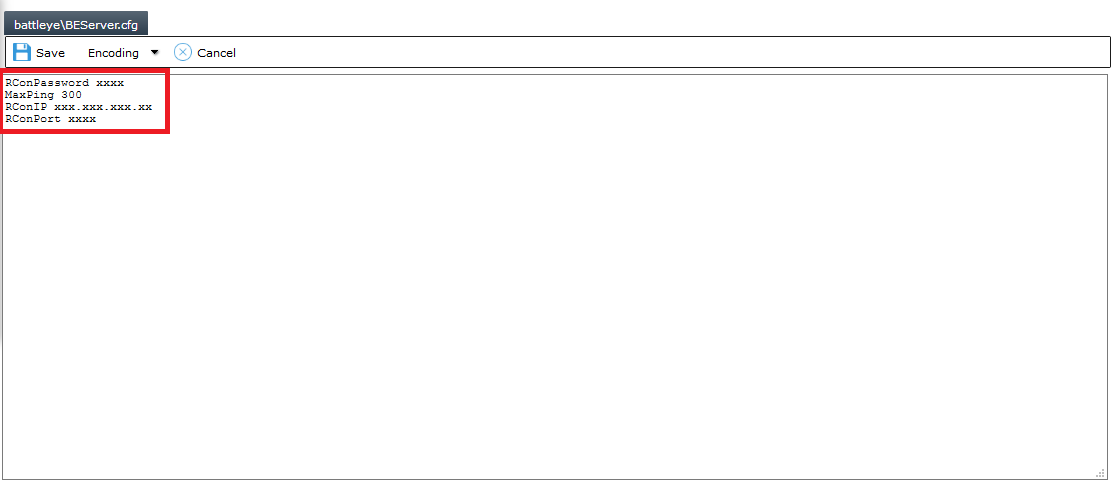
| + | Open up the BEserver.cfg in the text editor and you will see the following | ||
| + | |||
| + | [[File:arma_rcon_5.png]] | ||
| + | |||
| + | This displays all of the needed information above, the password which you can update along with the Rcon port (Do not change this.) It also displays "Rcon IP" but this is just the IP of the server | ||
| + | |||
| + | |||
| + | After gathering all of this information you can login after putting the information in their respective fields in your Rcon client and then hitting the connect button. | ||
| + | |||
| + | |||
| + | |||
| + | |||
| + | |||
| + | |||
| + | |||
| + | |||
[[Category:Arma 3]][[Category:Arma 3 Game Server Help Articles]] | [[Category:Arma 3]][[Category:Arma 3 Game Server Help Articles]] | ||
Latest revision as of 04:21, 25 July 2019
ArmA 3 Rcon Guide
BattleWarden (Free to use client)
Infistar (Note this is a paid client, you can not use this for free)
These are the current best known Rcon tools for ArmA 3, Infistar requires you to buy their product but is a great tool.
For this guide we will be using EPM Rcon
Connecting with your Rcon Client
All clients will use the same connection information, this section will go over how to get your Rcon connection information and where to put it in relation to EPM
In this image you can see the default GUI for the client, in the image above you will see where to go to reach the fields for inputting your connection information.
You will want to click on connect in the top left and then "connect to"
This will bring up a box to fill in the respective connection information
There are four fields to fill in within this new box, below I will go over what each entry is for
Admin Name - This is what your name will be displayed as in-game when issuing any commands that are shown to other players. For instance if you speak to the server it will display it under the name you have set in this field.
IP Address - This must be IP address of your server (See below images for how to locate your IP)
Port - This is the RCON port ( Located in your battleye\BEServer.cfg under configuration files. See image below )
Password - This is the password for your RCON Client ( Located in your battleye\BEServer.cfg under configuration files. See image below )
Example of where to location BEserver.cfg and IP for connection
Once in the configuration files you will see this
Open up the BEserver.cfg in the text editor and you will see the following
This displays all of the needed information above, the password which you can update along with the Rcon port (Do not change this.) It also displays "Rcon IP" but this is just the IP of the server
After gathering all of this information you can login after putting the information in their respective fields in your Rcon client and then hitting the connect button.


