Difference between revisions of "Arma 3 Wasteland Mod Installation"
Jump to navigation
Jump to search
How to setup A3 Wasteland
| Line 5: | Line 5: | ||
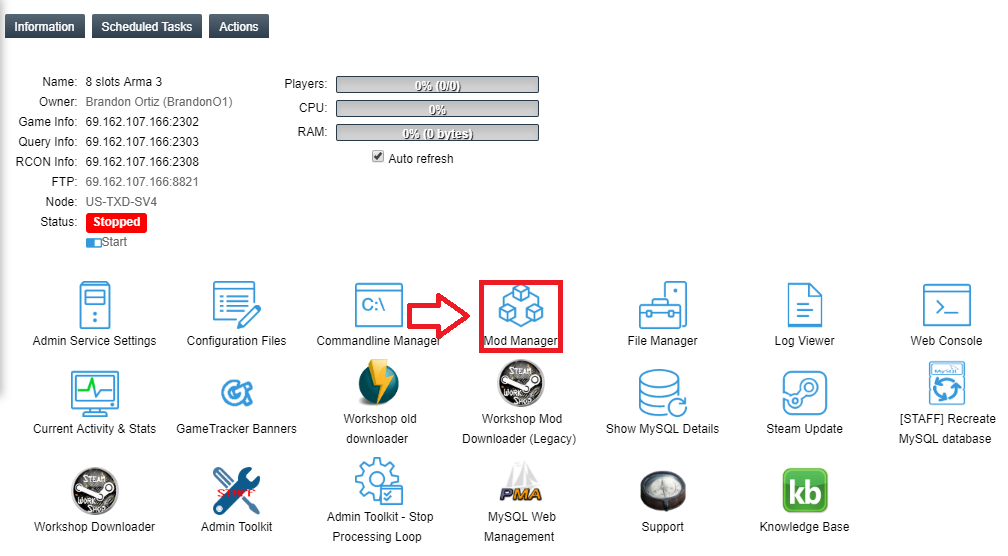
<div style="text-align: center;">Step 2. Click on <strong>Mod Manager</strong></div> | <div style="text-align: center;">Step 2. Click on <strong>Mod Manager</strong></div> | ||
| − | [[File:arma3stuff1]] | + | [[File:arma3stuff1.png]] |
<div style="text-align: center;">Step 3. Click <strong>Install</strong> on either Altis or Stratis depending on which you would like to install.</div> | <div style="text-align: center;">Step 3. Click <strong>Install</strong> on either Altis or Stratis depending on which you would like to install.</div> | ||
Latest revision as of 09:12, 21 July 2019
This Article will show you how to install A3 Wasteland mod for Arma 3.
How to setup A3 Wasteland
Step 1. Go to your Control Panel
Instructions on how to set it up
Step 1. Inside Configuration Files, click Text Editor on A3Wasteland_settings\main_config.sqf
Step 2. On the 2nd line from the bottom, where it says A3W_baseSaving = 0; change the 0 to a 1 to enable object saving.
Step 3. Click Save
Step 4. Go back to the Mod Manager
Step 5. Click Install on IniDB
Step 6. Go back to the Control Panel
Step 7. Click Commandline Manager
Step 8. Click Select on the Arma3 (Custom Mods) commandline
Step 9. In the -mod= box replace @mod1 with @iniDB
Step 10. Click Apply and restart your server
Congratulations you're all set to go!
Step 2. Click on Mod Manager
Step 3. Click Install on either Altis or Stratis depending on which you would like to install.
Step 4. Go back to the main Control Panel
Step 5. Click Configuration Files
Step 6. Click Configuration Editor on server.cfg
Step 7. Select the A3Wasteland Mission from the Server Mission: dropdown.
Step 8. Click Save
How to Enable Base Saving
Instructions on how to set it up
Step 1. Inside Configuration Files, click Text Editor on A3Wasteland_settings\main_config.sqf
Step 2. On the 2nd line from the bottom, where it says A3W_baseSaving = 0; change the 0 to a 1 to enable object saving.
Step 3. Click Save
Step 4. Go back to the Mod Manager
Step 5. Click Install on IniDB
Step 6. Go back to the Control Panel
Step 7. Click Commandline Manager
Step 8. Click Select on the Arma3 (Custom Mods) commandline
Step 9. In the -mod= box replace @mod1 with @iniDB
Step 10. Click Apply and restart your server
Congratulations you're all set to go!
